Saunas have been used for centuries as a way to promote relaxation and wellness. The dry heat not only helps you unwind but also offers various health benefits, including improved circulation and detoxification. Building your own sauna might sound like a daunting task, but with the right tools and materials, you can create a cozy sanctuary in your own backyard. In this comprehensive guide, we will walk you through the steps to build a sauna that you can enjoy for years to come.
Table of Contents
- What You’ll Need
- Choosing the Right Location
- Designing Your Sauna
- Gathering Materials
- Building Your Sauna
- Installing the Heater
- Adding Finishing Touches
- Maintaining Your Sauna
- Enjoying Your DIY Sauna
1. What You’ll Need
Before you start building your sauna, let’s gather everything you’ll need. Here’s a list of tools and materials:
Tools:
- Tape measure
- Level
- Hammer or nail gun
- Screwdriver (cordless is best)
- Saw (circular or miter saw)
- Drill
- Safety goggles
- Work gloves
Materials:
- Sauna wood (like cedar or pine)
- Insulation (fiberglass insulation is common)
- Vapor barrier (plastic sheeting)
- Sauna heater (electric or wood-burning)
- Wood for the frame (2x4s or 2x6s)
- Roofing material (shingles or metal roofing)
- Nails and screws
- Benches (can also be made from sauna wood)
2. Choosing the Right Location
The first step in building your sauna is choosing the perfect spot. You want to ensure your sauna is placed in a location that is:
- Private: This allows for relaxation away from prying eyes.
- Accessible: Make sure it’s easy to get to, especially when you’re wet after a sauna session.
- Level Ground: Find a flat area to build your structure. You may need to level the ground or create a small foundation with concrete blocks or treated wood.
3. Designing Your Sauna
Now that you’ve chosen a location, it’s time to design your sauna. Consider the following:
- Size: Saunas come in various sizes. A two-person sauna might be about 4×6 feet, while a larger sauna could be 8×12 feet.
- Layout: Common sauna designs have benches along the walls, with space in the middle for standing and moving.
- Windows: Adding a window can give you natural light and a view of the outdoors. Use tempered glass for safety.
- Door placement: Make sure the door opens outward to ensure safety during use.
4. Gathering Materials
With your design in mind, it’s time to gather your materials. Visit your local hardware store or lumber yard to purchase everything you need. It may help to make a detailed shopping list based on your design above to avoid multiple trips!
When selecting wood, make sure it’s suitable for high-heat environments, as this will help in maintaining the sauna’s longevity.
5. Building Your Sauna
Now, the fun part—building your sauna! Here’s a step-by-step guide:
Step 1: Build the Frame
- Lay the Foundation: Start with a solid foundation. Depending on your design, you may want a simple wood deck or a more elaborate concrete slab.
- Construct the Walls: Using 2×4 or 2×6 lumber, build the wall frames. Don’t forget door and window frames. Stand the walls up and secure them together, ensuring they’re level.
Step 2: Insulate and Install the Vapor Barrier
- Insulate the Walls: Fill the spaces between your wall studs with insulation to help maintain heat. Fiberglass insulation works well, but make sure to follow the manufacturer’s instructions.
- Install the Vapor Barrier: Cover the insulation with a vapor barrier to prevent moisture from escaping. Use plastic sheeting and make sure to seal any seams with tape.
Step 3: Add the Exterior Walls
- Attach the Sauna Wood: Now it’s time to add the exterior layer. Use your chosen sauna wood (like cedar) to cover the frames, making sure to space the boards to allow for ventilation.
- Install Windows and Door: Carefully install your window and door, ensuring they fit snugly and are well-sealed.
Step 4: Roof It
- Build the Roof Frame: Using the same lumber, create a roof frame. Make sure it slopes to allow for runoff.
- Cover with Roofing Material: Install shingles or metal roofing on top of the frame to protect your sauna from the elements.
6. Installing the Heater
Once the main structure is complete, it’s time to install the heater.
- Choose the Right Location: The heater should be placed according to the manufacturer’s instructions, usually in a corner away from people using the sauna.
- Follow Electrical or Wood Instructions: If you’re using an electric heater, you may need to hire a professional electrician for proper installation. If it’s a wood-burning stove, follow safe installation recommendations.
7. Adding Finishing Touches
After the heater, add final touches to your sauna.
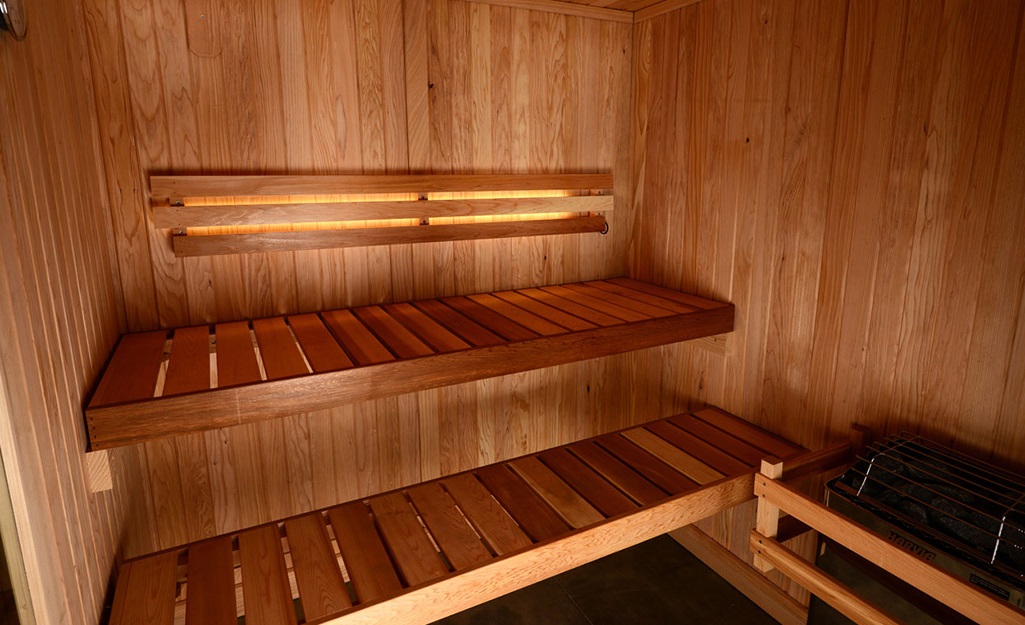
- Build Benches: Use sauna wood for benches that can be built at different heights. The top bench should be higher up for maximum heat exposure.
- Install Lighting: Choose soft, warm lighting. Use fixtures that are rated for high-heat environments to prevent any risks.
- Ventilation: Proper ventilation is critical in a sauna. Make sure you have adjustable vents to let in fresh air from the outside.
8. Maintaining Your Sauna
After building your sauna, you’ll want to ensure it lasts. Here are some maintenance tips:
- Regular Cleaning: Clean the surfaces regularly to prevent mold and mildew buildup. Use a mixture of water and vinegar for a natural cleaner.
- Check for Damage: Inspect the wood and insulation periodically for any signs of wear or damage.
- Heater Maintenance: Follow the manufacturer’s guidelines for maintaining the sauna heater. This will ensure safety and efficiency.
9. Enjoying Your DIY Sauna
Congratulations! You’ve built your very own sauna. Now it’s time to enjoy it. Here are a few tips for a great sauna experience:
- Start Slow: If you’re new to saunas, begin with shorter sessions of about 10-15 minutes, gradually increasing the time as you become more accustomed.
- Stay Hydrated: Drink plenty of water before and after your sauna session to stay hydrated.
- Bring Essentials: Consider bringing a towel to sit on, essential oils for added relaxation, and calming music to elevate the atmosphere.
- Cool Down: After your sauna session, take a cool shower or dip in a pool to refresh your body.
Conclusion
Building your own sauna is a rewarding project that pays off in relaxation and health benefits. With the right materials, planning, and dedication, you can create a personal oasis right in your backyard. Whether you opt for an electric or wood-burning heater, and however you choose to decorate your space, the most important part is enjoying your new sauna. So gather your tools, get crafty, and immerse yourself in the warm, tranquil world of your very own sauna!
Happy building!